What Is The First Step To Pay-Per-Click Marketing
By Joel Black on 11/4/2013
If you have not dove into pay-per-click marketing and are holding off because it seems to confusing, I’ll share an easy step-by-step tutorial that will have you up and running in less than an hour. Pay-Per-Click (PPC) advertising is most commonly executed through Google Adwords, but there are many other sites including Bing, Facebook, Twitter and LinkedIn who offer PPC advertising. We will cover Google Adwords in this post and other channels in future post. In case you’re not completely clear on what PPC is, PPC means you will pay for a keyword to show up in a search, and if a user clicks on it, you will pay a pre-determined cost for that click. It’s a quick and easy way to drive qualified traffic to your website. So lets dig in.
Set Up Your Google Adwords Account
The first thing to do is to visit Google Adwords and create a login. If you already have a login to Google services such as Gmail, you may be able to use that same login when creating an account.
Set Up Your Campaign
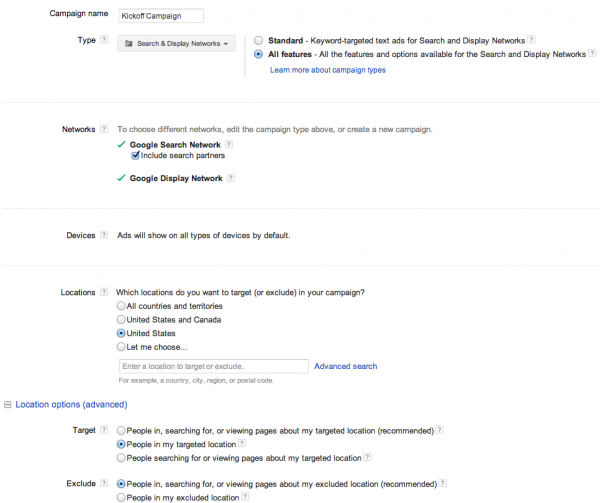
After you have created a login and are inside of Google Adwords, it’s time to create your first campaign. A campaign is a high level “bucket” that all of your ad groups will reside in. A campaign will have a budget, geographical area and many other defining features. A good example would be a Christmas campaign that will run until the end of the year and would have many different ads or products within it. Here are a few important things to setup when your on this campaign page:
- Set to all features
- Set the location to your specific area, such as Atlanta, GA or the entire United States if your national
- On “location options” I like to set “people in my area”, which will help weed out people from India for example, who search for companies in the US and try to sell them products or services.
- Set your max daily budget
- Ad extensions: You’ll want to add your address and phone number here, it will help your ad display better
- Ad delivery: You can set schedules here if you like, such as M-F 9am – 5pm
Set Up Your Ad Group
Your ad groups will be just that, groups of ads that are logically and strategically organized. An example of an ad group would be a specific product. Inside the ad groups would be ads that are displayed for users to click on. You could set up multiple ads inside the group, best practice is two ads minimum. This would provide somewhat of an A/B test to see which is the better performing ad.
You will also have the option to set up your first ad on this page. Go ahead and set up a headline, it should contain your best keyword. Also, go ahead and add your description 1 and 2. Remember to add a punctuation to description 1, as it will help you gain a higher position at the top of page.
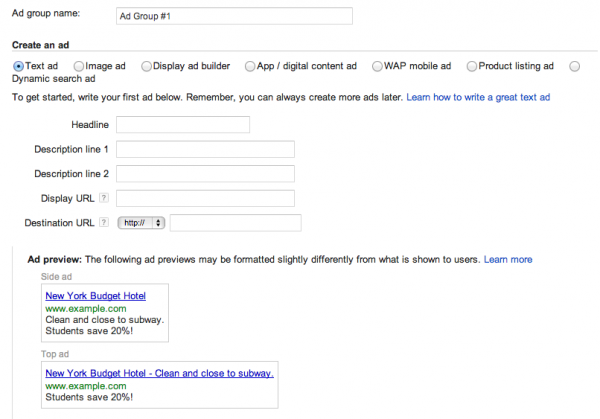
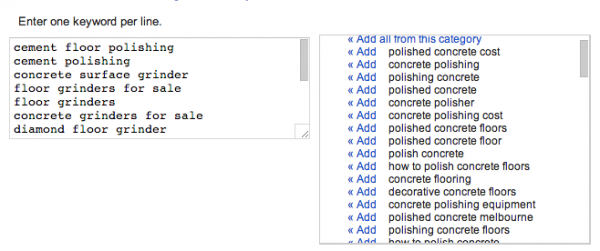
Set Up Keywords
On the ad group page you will also have the opportunity to set up keywords. These keywords will make up the phrases that trigger your ads. It is best practice to have no more than 10 keywords or key phrases in an ad group, so don’t go crazy. Set up different ad groups to add related keywords, best practice is to keep keywords and ads highly relative.
Set Up Billing
At this point you have your first campaign, ad group and ad set up. The final step is to continue to billing, then your all set up. One thing to remember on billing is that you have two options, manual payments in which you manually make payments and are reminded when your budget is exhausted, and automatic payments that charge your card automatically when your budget reaches a specific threshold. I opt for automatic, your budget you set up earlier will make sure your not overcharged.
Advanced Settings
I’ll circle back around in follow up posts to discuss things such as remarketing and display based ads. For now, this will get you started and on the road to driving new traffic to your site. If you have any questions, post it in the comments below. We also manage Adwords for clients, so if you don’t want to deal with managing it yourself, please give us a call or contact us using the contact page.